The Grand Ole Apiary

  • About Us
    • Cottagesteading
    • The Grand Ole Apiary Kits
  • Our Cottage
    • Our Kitchen
  • Our Garden
    • Cottage Beekeeping
  • Our Table
    • Sourdough
    • Wood Stove Cooking
    • Cheese
    • Pasta
    • Preserving
  • Our Hands

DIY Beeswax Wraps – How to make at home (and save money!)

Our Hands

30 Jun
  • Facebook
  • Print
Woman holding bowl covered in beeswax wrap

July means something special for any zero-waste hopeful like me. Plastic Free July! The prettiest and most practical zero-waste swap out I have found, has to be replacing cling wrap with beeswax wraps. There is a reason they have become so popular! They work really well, and look great to boot. Let me take you step by step, through my favourite method for making DIY Beeswax Wraps at home. Its super easy – I promise!

Beeswax wraps are easy to care for and long lasting. They will last up to a year with normal use, and then can just be touched up with more of the mixture to go another year! The best part is – even if one of your wraps gets ruined, it is made of 100% natural materials. So it can be composted! They really are the darling of the zero-waste community.

If you are keen, these DIY beeswax wraps can even be made into sandwich/snack bags by sewing the edges after making the wrap.

If you would like to just get straight into using wax wraps, we have DIY Beeswax Wrap Kits for sale in our shop. These kits allow you to have all the fun of making the wraps yourself, without the worry of sourcing and purchasing individual ingredients. Bonus – as the pine resin is already incorporated into the beeswax, the process is much quicker!

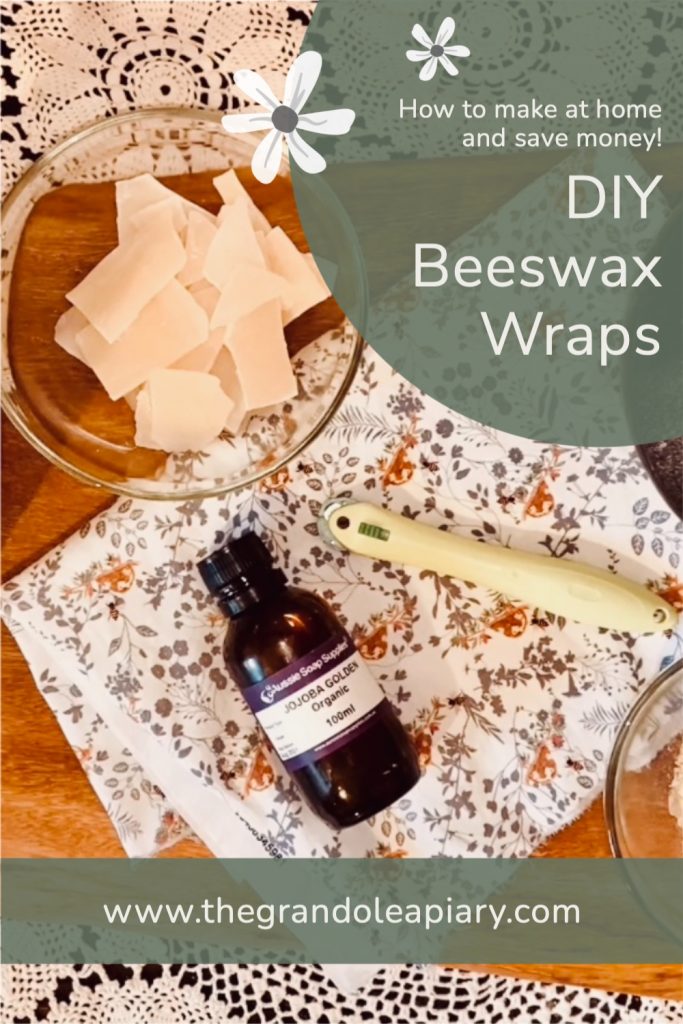
Gather your supplies:

Craft materials on table

Equipment:

Check the Tips & Tricks section below for more info

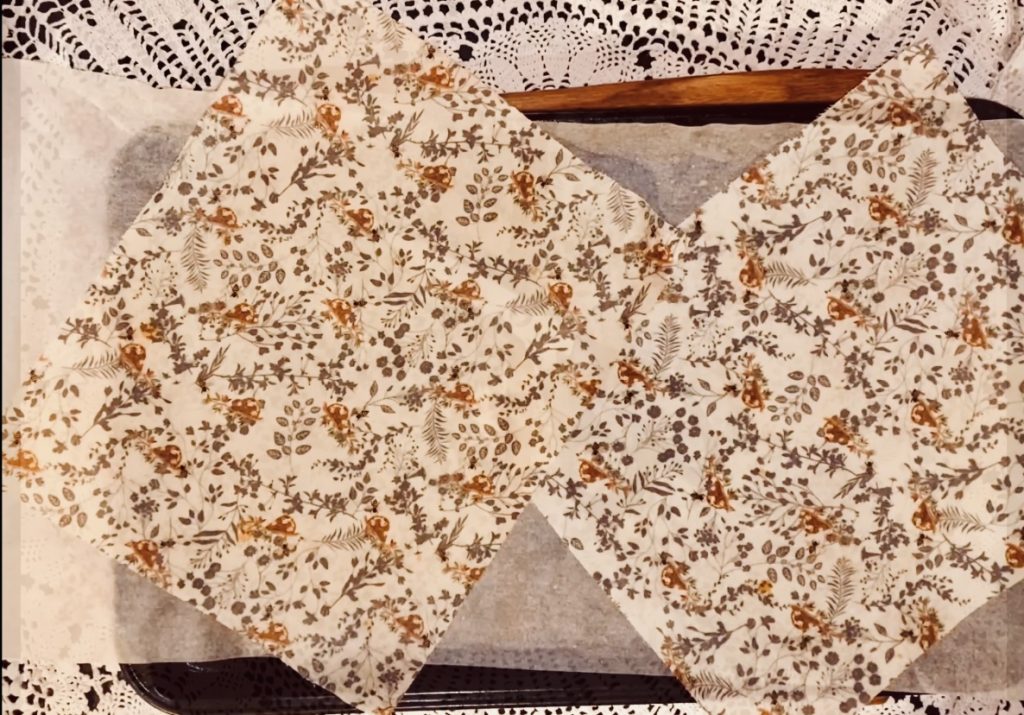
  • Fabric – This tutorial will make 2 wraps 25 x 25cm. If you scale the recipe up or down, adjust your fabric amount to suit.
  • Cutting tool – scissors or a rotary cutter & cutting mat.
  • Mortar & Pestle – You will need to crush your pine resin if it is in chunks.
  • A jar or bowl to melt your ingredients.
  • Pot/saucepan to boil water for double boiler.
  • Pastry/paint/foam brush – a dedicated one is best.
  • Baking tray/cookie sheet – at least as big as your biggest fabric square.
  • Foil – if you want to protect the tray/sheet.
  • Wax paper – one piece at least as big as your biggest fabric square, preferably big enough to overhang the baking tray.
  • Optional – pinking shears. These are great to edge your wraps to prevent fraying (plus it looks ADORABLE). You can cut your fabric with them at the start, or wait and edge your finished wraps. This is my preference, but either way works!

Ingredients:

  • Beeswax – try to find wax from a local or small scale apiary. Beeswax from large commercial operations can contain chemicals and pesticides from the crops the bees have been pollinating. Also, be very careful purchasing wax from eBay or similar – beeswax from some countries has been found to be diluted with paraffin wax. Know your beekeeper! Or become the beekeeper….
  • Pine resin – these wraps are going to be in contact with your food, so you will need food grade/chemical free. You could also use propolis – I use a mixture depending on how much propolis we have on hand. Both work equally well.
  • Oil – I like to use Jojoba oil – Jojoba oil is reported to have antibacterial properties, so it’s perfect for this project (useless fact of the day – Jojoba Oil is actually a wax that acts like an oil!). The best alternative to Jojoba oil is fractionated coconut oil. Don’t use standard coconut oil as it can go rancid and ruin your wrap.

Making your diy beeswax wraps:

melting the wax and pine resin

If your pine resin is in chunks, you can go ahead and crush it. Once its powdered, add the beeswax, resin and Jojoba oil into your jar.

Place your jar into a pot of boiling water. I find that I need to start with a small amount of water in the pot, so the jar doesn’t tip over. Once the wax has melted, I top up the pot. 

The wax will melt quite quickly, but the resin will take much longer. I find for the quantity in this recipe, it takes around half an hour to forty minutes.

Just keep stirring it occasionally. The resin will melt into a ball initially, you will need to keep breaking it up so that it melts and distributes through the wax better. Don’t stress too much if you don’t get ALL of the resin distributed. I am usually left with a small amount in the bottom of my jar that just never dissolves. That’s OK!

prepare your fabric

While your ingredients are melting, prepare your fabric & wax paper. You will need your fabric cut to whatever size you have decided on, and one piece of wax paper big enough to comfortably cover your tray.

Place the wax paper on a baking tray, and one piece of fabric over the top. 

Once your wax mixture is melted as much as you think its going to, you can begin coating your fabric. 

coating the wraps

woman brushing wax onto fabric

Using your pastry brush, coat your fabric fairly evenly. Don’t worry too much if it looks a little thick in some parts. Use about half your mixture here.

Place the tray into the oven for a minute or two, to let the wax remelt and soak into the fabric. 

Remove, and place your second fabric square on top. Press, and allow the second piece to soak up any excess from the bottom square. Repeat the brushing process, focusing on the areas that look dry, corners, and the edges. Return your jar to your pot, and place the tray back into the oven for another minute or two. Remove, flip over, return to oven.

Give it a minute, and remove. Check that it looks ok, and there are no dry spots. If it all looks good, you can dry your wraps. Working quickly, separate the fabric squares and just wave them a little. They will dry very fast. Let them sit for a few minutes to cool. 

beeswax wraps drying on table

make it pretty!

Now you can trim the edges. The reason I like to do this at the end, is because sometimes the mix is not enough to get all the way to the edge of the fabric (depends how much pine resin did not melt). So by trimming after coating, I can just trim off any edges that did not get coated.

And viola! Now you have two gorgeous, sticky DIY Beeswax Wraps!

tips and tricks

Protecting your equipment:

There is a chance of getting the mix on any equipment you use, and in your oven. I recommend to either use equipment you don’t mind getting wax on, or be super careful with protecting it. Some items will definitely have to be dedicated forevermore to making DIY Beeswax Wraps (ie the jar and brush). But you can use your normal baking tray and boiling pot, if you are very careful.

Oven tray: To protect your tray, use a double layer of foil under the wax paper. Just be aware that while the mix will peel easily off wax paper, it wont from foil. So even if you have the foil layer, you will still need the wax paper.

Saucepan/pot: To protect your boiling pot, make sure the mix is not anywhere on the outside of the jar or bowl when placing back onto the heat. If you use a bowl, it is possible to get the mix on the outside of the bowl when doing the brushing. Its also easy to get the mix onto both the jar and bowl if you pick them up with the mix on your fingers. Any mix on the outside of the jar/bowl, will melt into the water and coat your pot. Try to only pick up your jar/bowl with an ovenmit or tea towel.

Mortar & pestle: I have a mortar and pestle to crush my resin, but you could also place it between sheets of wax paper and use a rolling pin. If you use a mortar and pestle, just know that you probably wont be able to use it for anything else afterwards!

Pinking shears: Using pinking shears on completed wraps will mean you will get a small amount of the wax on your shears. If this is a problem for you, it is best to use the shears prior to waxing your fabric.

Your fingers: The mix is very, very hot, and will stick to ANYTHING. Be super careful around it. This is definitely not an activity for unsupervised children.

Choosing your materials:

Fabric – Try to use natural fibres, I like cotton but you could use linen too. Don’t use anything too thick.

Melting jar – I use a tall jar as it is easier to pour the mix out of, but you can use anything really. Remember, whatever you use will need to be dedicated to this as it will be forever coated in a thin layer of wax and resin!

Let me know how you go with your awesome new wraps – and if you have any leftover beeswax, try this great 2 ingredient lip balm too!

Pinnable image for DIY beeswax wraps

  • Facebook
  • Print

2 Comments

Previous Post: « Spring planting garlic – 10 Steps for a great harvest
Next Post: (Super Easy!) How to Make: Lip Balm Recipe with Beeswax »

Reader Interactions

Comments

  1. Melanie Jean Schroeder says

    August 23, 2025 at 10:01 am

    Thanks for the tutorial. Can you tell me why you include pine resin?

    Reply
    • thegrandoleapiary says

      September 13, 2025 at 8:57 pm

      Hi Melanie, it’s to make the wraps slightly more flexible and tacky when warmed up (with your hands).

      Reply

Leave a Reply Cancel reply

Your email address will not be published. Required fields are marked *

Recipe Rating


Primary Sidebar

Welcome to the Cottagestead!

Honey and chicken

We are so happy to see you!

Take your boots off, make yourself a cuppa, and join us as we recreate an

old-fashioned cottagestead life

in our little workers cottage.

Subscribe

Let’s Connect

  • Facebook
  • Instagram
  • Pinterest

Instagram Feed

the_grand_ole_apiary

Instagram post 18035008276389738 Instagram post 18035008276389738
Instagram post 17979079843656170 Instagram post 17979079843656170
I was thrilled to receive these pics and feedback I was thrilled to receive these pics and feedback from my very first Sourdough Workshop. I can’t wait for my next one 31/7 at @studio_on_sunshine
Still 2 spots left!

“Hi Alison. Here is a picture of my first sourdough loaf. I’m really thrilled with it. I have already made a really lovely focaccia bread and I’m preparing to make a couple of sourdough pizzas. Thank you so much for your workshop. I had an amazing time.”
❤️❤️❤️❤️❤️❤️❤️
Ok, I feel like I’m getting closer to figuring t Ok, I feel like I’m getting closer to figuring this out! Now I just have to remember every step I took to get to this point and repeat it perfectly every time 😂

#metters #metterscanberra #canberrastove #mettersstove #mettersoven #metterscooking #mettersstoverenovation #woodfiredoven #woodfiredcooking #cottagecooking #cottagestead #cottagesteading
#cottagelife #cottageliving #cottagekitchen #oldfashionedonpurpose #offgridaustralia  #simplelivinglifestyle #aussiesourdough #australiancottage #aussiecottage #youmeandjunee #waggawagga #waggafood #sourdough #woodfiredsourdough
Well it’s in!!! We finally have our gorgeous old Well it’s in!!! We finally have our gorgeous old Metters installed in the kitchen. Here she is, a bit rough looking yes - can’t wait to finish the tiling and the mantle! 
We are already LOVING our kitchen being so warm, and a kettle that’s always hot ❤️
We are still learning how to control the temp - so brace yourselves for some burnt, undercooked, flat or oddly shaped sourdough pics 😂 

#metters #metterscanberra #canberrastove #mettersstove #mettersoven #metterscooking #mettersstoverenovation #woodfiredoven #woodfiredcooking #cottagecooking #cottagestead #cottagesteading
#cottagelife #cottageliving #cottagekitchen #oldfashionedonpurpose #offgridaustralia  #simplelivinglifestyle #aussiesourdough #australiancottage #aussiecottage #youmeandjunee #waggawagga #waggafood
This sweet girl, drowning in rocket! I think she m This sweet girl, drowning in rocket! I think she may be in chicken paradise 🤤

#chooks #chooksofinstagram #isabrown #isabrownchickens #backyardchickens #chickensofinstagram #freerangechickens #cottagestead #cottagesteading #cottagegarden #cottagestyle #cottagelife #chickensinthegarden #permaculture #permaculturelife #permacultureaustralia #homesteading #urbanhomestead #suburbanfarming #countrylife #countrycottage #aussielife #aussiechickens #australiancottage #gardeningwithchickens
Two spots left in my Sourdough Starter to Scoring Two spots left in my Sourdough Starter to Scoring Workshop - Sunday 22nd May 🌾 

Message to book if you would like a spot!
Instagram post 17937139336942144 Instagram post 17937139336942144
These are definitely among the last of the gorgeou These are definitely among the last of the gorgeous tomatoes coming out of our garden this season 😭 Bye home grown tomatoes, next stop Zucchini Relish town! 

#cottagestead #cottagesteading #cottagelife #cottageliving #cottagegardener #potagergarden #oldfashionedonpurpose #simplelivinglifestyle #youmeandjunee #waggawagga #offgridaustralia #countrynsw #livinginthebush #aussiesummer #aussiebushliving #rurallife #organicvegetablegarden #homegrowntomatoes #sanmarzanotomatoes #zucchinirelish
Very excited to have some of my beeswax & sourdoug Very excited to have some of my beeswax & sourdough goodies available at Studio on Sunshine again! ❤️❤️❤️

Kids going a little stir crazy this bit of school holidays?🤪🤪

We have 2 🐝BEESWAX making kits. $25 each each kit

We also have "sourdough" starters for $20.

And 1 whole SOURDOUGH STARTER KIT $94.95 even includes the bowl!

Why not teach the kids a little something, learn a little something about making your own sourdough🥣🥖 

All popped together by talented local sourdough maker  Alison  of @the_grand_ole_apiary 🙌🏻

➡️➡️VIRTUAL SHOPPING⬅️ 

INBOX📥 OR TXT/CALL 0402759570 to purchase over the phone with SQUARE secure pay options 

🚚🚚🚚🚚🚚🚚🚚🚚🚚🚚🚚
FREE NON CONTACT DELIVERY WAGGA & JUNEE 
🚚🚚🚚🚚🚚🚚🚚🚚🚚🚚🚚 

Postage available outside our area. Please contact directly VIA INBOX for postage quote to required area
#waggaartist
#riverinalocal
#riverinamurraybusiness
#RUSTICBASKETSTUDIOONSUNSHINE
#THERUSTICBASKET
#riv.bis
#visitriverina
#lovensw
#myriverinamurray #loveyourlocal #letusbringhandmadetoyou #keepitlocal #shoplocalinjunee #supportsmallbusiness #shopjunee #juneensw 
#theresnothinglikeusintheregion #supportsmallbusiness #riverinamurrayhandmade #handmaderiverinamurray #studioonsunshine #buyhandmade #comeseejunee #visitjunee #youmeandjunee #juneensw #supportlocalbusiness #locallyhandmade #riverinamurrayhandmade #visitriverinamurray #destinationriverinamurray
#juneeshopping #visitruralandregionalaustralia
#studioonsunshine
I just adore how much kids love chooks - and their I just adore how much kids love chooks - and their Grandmas!

#chooks #chooksofinstagram #isabrown #isabrownchickens #backyardchickens #chickensofinstagram #freerangechickens #cottagestead #cottagesteading #cottagegarden #cottagestyle #cottagelife #chickensinthegarden #permaculture #permaculturelife #permacultureaustralia #homesteading #urbanhomestead #suburbanfarming #countrylife #countrycottage #aussielife #aussiechickens #australiancottage #kidswithchickens
Always happy to@see my bread going to a loving hom Always happy to@see my bread going to a loving home 😂❤️ @acwoodworkss 

AC Woodwork made chopping board, AC Woodwork made knife and @the_grand_ole_apiary made sourdough. Nice surprise delivery this morning! 
.
.
.
#woodworking #woodwork #wooden #handmade #homeware #timber #wood #kitchen #sloyd #kitchenutensils #kalthoffaxes #woodworker #waggawagga #youmejunee #riverina #spooncarving #carving #carve #woodcarving #greenwood #woodenspoon #sourdough #sourdoughbread #sourdoughstarter #southaustralia
Haven’t posted a sourdough for a while! Can’t Haven’t posted a sourdough for a while!  Can’t wait to tuck into this one 🤤🐝🌾

#cottagecooking #wildyeast #naturallyleavened #homemade #sourdoughclub 
#offgridaustralia #homemadebread #homemadeaustralia #simplelivinglifestyle #breadbosses #aussiesourdough #aussiebread #homebaking #prettyscoring #artisan 
#breadart #breadscoring #sourdoughscoring #sourdoughbread #sourdoughaustralia #youmeandjunee #waggawagga #waggafood #cottagestead #cottagesteading
#cottagelife #cottageliving #oldfashionedonpurpose
How gorgeous are these Zucchini flowers? A boy and How gorgeous are these Zucchini flowers? A boy and a girl right next to each other. The bees will find these this morning, *cue Barry White* and a baby zucchini will be along in a few weeks. Ain’t love grand?

#cottagestead #cottagesteading #cottagelife #cottageliving #oldfashionedonpurpose #simplelivinglifestyle #youmeandjunee #waggawagga #offgridaustralia #countrynsw #livinginthebush #aussiewinter #aussiebushliving #rurallife #sexyplants #organicvegetablegarden
This perennial leek was almost too pretty to pick! This perennial leek was almost too pretty to pick! I just love leek and garlic flowers, it’s worth growing them just for that! They make great additions to the flower garden too!

#perennialleeks #perennialvegetables #permacultureaustralia #junee #vegetablegarden #organicgardening 
#cottagestead #cottagesteading #cottagelife #cottageliving #oldfashionedonpurpose #simplelivinglifestyle #offgridaustralia #countrynsw #livinginthebush #rurallife
We have a few Frankentrees here at the Apiary, but We have a few Frankentrees here at the Apiary, but this new graft is the one I’m most excited about! I have been trying to get Cox’s Orange Pippin scions to take for the last 3 seasons with no luck… 😩 I purchased two scions from @la_petite_pomme_orchard and guess who has a successful graft???? 🙋‍♀️Me!!! I am pathetically excited about this scraggly looking twig!🍎🍎🍎

#cottagestead #cottagesteading #cottagelife #cottageliving #oldfashionedonpurpose #simplelivinglifestyle #youmeandjunee #waggawagga #offgridaustralia #countrynsw #livinginthebush #aussiewinter #aussiebushliving #rurallife
#grafting #graftingfruittrees #coxsorangepippin #mead #ciderapples #cider
BEFORE & AFTER I am so in love with my gorgeous co BEFORE & AFTER
I am so in love with my gorgeous copper #fowlersvacola preserver! I gave it a quick strip and polish to clean up the tarnish and OMG 😍😍😍😍😍

#cottagestead #cottagesteading #cottagelife #cottageliving #oldfashionedonpurpose #simplelivinglifestyle #polishedcopper #copperporn #copperpots #preservingfood #bottlingfruit #aussiepreserver #fowlers
This little apiary was feeling pretty naked today! This little apiary was feeling pretty naked today! I feel very guilty removing any original part of this old beauty 😟 But when the rain starts threatening the pressed metal ceilings, it’s tough decision time. I hope this new roof will protect our home for many, many years to come! One century under her belt, I reckon she can do another century…

#cottagestead #cottagesteading #cottagelife #cottageliving #cottagegarden #oldfashionedonpurpose #springgarden #aussiegarden #aussiecottage #aussiecottagegarden #riverinagardens #juneensw #renovation #cottagerestoration
So many swarms this season, the old Bob Ross bee b So many swarms this season, the old Bob Ross bee box has been put to work! 🐝

#beekeepingaustralia #aussiebeekeeper #swarm #swarmtrap #swarmcatching #backyardbeekeeping #waggabeekeeper #nswbeekeeping #suburbanbeekeeping #cottagebeekeeper #cottagebeekeeping #beekeeping #backyardbeekeeper #aussiespring #aussiebees 
#youmeandjunee #waggawagga #cottagestead #cottagesteading #cottagelife #cottageliving #cottagegarden #cottagekitchengarden #oldfashionedonpurpose #bobrosswouldbeproud #permacultureaustralia #aussiebush #countrynsw #livinginthecountry
That’s it ladies, in you go 🐝🐝🐝 #beeke That’s it ladies, in you go 🐝🐝🐝

#beekeepingaustralia #aussiebeekeeper #swarm #swarmtrap #swarmcatching #backyardbeekeeping #waggabeekeeper #nswbeekeeping #suburbanbeekeeping #cottagebeekeeper #cottagebeekeeping #beekeeping #backyardbeekeeper #aussiespring #aussiebees 
#youmeandjunee #waggawagga #cottagestead #cottagesteading #cottagelife #cottageliving #cottagegarden #cottagekitchengarden #oldfashionedonpurpose #offgridaustralia  #permacultureaustralia #aussiebush #countrynsw #livinginthecountry
Follow on Instagram

Copyright © 2025 · Refined Theme on Genesis Framework · WordPress · Log in